Posted on

Egg & Sausage Breakfast Bites

Egg & Sausage Breakfast Bites

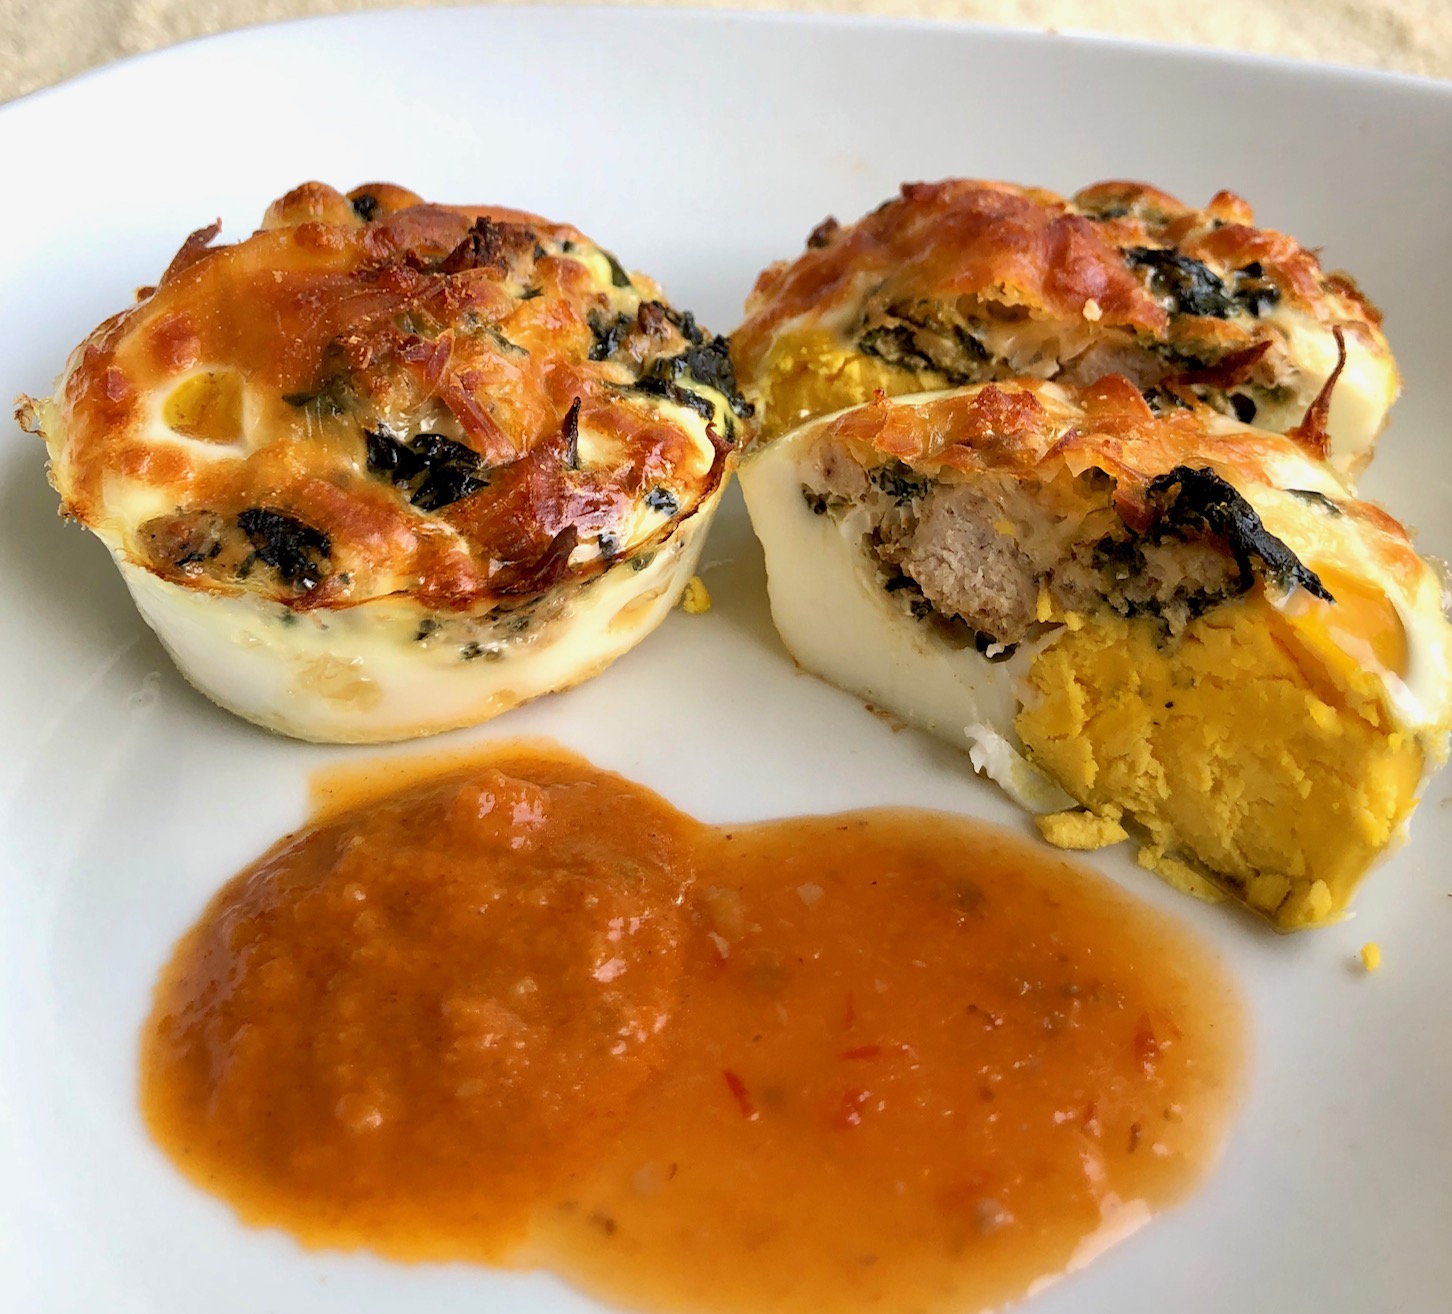
Super simple meal prep! These egg and sausage breakfast bites are a great on-the-go breakfast when you have limited time in the morning.

Egg White & Sausage Breakfast Bites
Egg white-only version (lower cal, lower fat).

In the morning, it’s all about fast and easy. These delicious egg and sausage breakfast bites are designed for bulk meal prep to get a high protein breakfast without extra fuss in the kitchen every morning. They provide the full flavor of sausage with a fluffy texture from the egg, and a nice finish with cheese baked on top. Pop in the microwave for 20 seconds, grab some fruit or toast, and go!

I made a pan of home made sausage crumbles to mix in these egg bites so I can control the ingredients and focus on eating less processed foods. The homemade sausage spice hits just the right flavor. To save time, make a large batch of sausage seasoning and store in the pantry.. If you want to kick it up a bit, red chili flakes are a great addition.

The secret ingredient to add deeper flavor is Peri-peri sauce which provides a mild peppery kick and light garlic flavor. I buy this one but there are many available on the market.

I’ve found the best molds to make these are 12 well silicone muffin pans. The egg bites pop right out after cooling. Be sure to place a metal baking sheet underneath for rigid support and heat conduction.

Egg White Bite Nutrition Comparison:

  • Starbucks Egg White & Roasted Red Pepper Sous Vide Egg Bites (2 bites): 170 kcal, 12g protein, 11g carbs, 8g fat
  • This recipe (2 bites): 125 kcal, 24.5g protein, 1.3g carbs, 2.4g fat.

This recipe also works great with whole eggs (see notes section)!

Whole Egg Bite Nutrition Comparison:

  • Starbucks Ham, Cheddar & Peppers Sous Vide Egg Bites (2 bites): 250 kcal, 17g protein, 11g carbs, 16g fat
  • Whole egg version of this recipe (2 bites): 219 kcal, 24.6g protein, 2.1g carbs, 12.5g fat
Egg & Sausage Breakfast Bites
Whole egg version (see notes section of recipe).


Need personalized nutrition support to reach your physique and health goals? Contact me.

Disclosure: as an amazon associate I earn from qualifying purchases. This supports keeping the website ad and pop-up free.

Posted on

Balsamic Roasted Broccoli & Peppers

Balsamic Roasted Vegetables

Who says veggies can’t be delicious? Simple sweet balsamic roasted broccoli and peppers dish is great side dish for lunch or dinner.

Balsamic Roasted Vegetables

For this balsamic roasted broccoli and peppers, ensure your cut veggies are spread out on your baking sheet and that the pieces aren’t touching. Like most vegetables, raw broccoli has a very high water content so by spreading it out we ensure that moisture can escape during cooking and the broccoli roasts instead of steaming.

Really, you could use a number of different vegetable combinations, cooking time may vary. Other great options that taste amazing roasted is cauliflower, brussels sprouts zucchini, and even kale. Play around with it!

You’ll be surprised how much the veggies shrink after baking. I recommend making multiple batches and storing them in the fridge for eating throughout the week with lunches and dinners.


Need some help with your nutrition to get healthier, improve physique, and and fuel your performance? Contact me.

Posted on

Meal Prep: Green Dragon Lean Turkey Sliders

These lean little turkey burgers pack a lot flavor thanks to Trader Joe’s Green Dragon Sauce.

Lean ground turkey (99/1 or 93/7) is a staple food in my weekly meal prep. Usually I throw it in a pan as-is with whatever seasoning I’m in the mood for….lemon pepper, taco seasoning, hot sauce, harissa, or simple salt and pepper.

One great way to turn ground turkey into a portable snack is to make sliders. For this, my go-to seasoning is Trader Joe’s Green Dragon Hot Sauce plus Everything But the Bagel Seasoning. It takes boring dry turkey and converts it to magical deliciousness – that’s all I’ll say. If I’m in a huge rush sometimes I throw these in a plastic bag and eat as a snack on the road. More often than not, I put them in pitas with some lettuce – and extra Dragon Sauce.

Green Dragon Hot Sauce is a mild sauce, and NOT made with bits of real dragon. No dragons are harmed in the making of these burgers.

Not true.

Important note for this recipe to ensure you get juicy sliders – as you form them in your hands use only your fingertips and just enough pressure to make the shape. We want to keep them airy. If you over-compact the mixture the burgers will turn out tough and dry. During cooking, the patties will puff up a bit, make them flatter again by lightly pressing down on them with a spatula.


An entire 16 oz package of 99/1 lean ground turkey has 104 g of protein, 0 g carbs, and 6 g of fat. I chose to divide the mixture into 11 patties to get just under 10g of protein per burger. Divide how you wish – make fewer or more depending on your plan and how you want to eat them.


Please let me know if you’ve tried this recipe for your meal prep, and how you like them!

Ready to work on your nutrition plan for fat loss, performance improvement, or just to improve your habits? Contact me.

Disclosure: as an amazon associate I earn from qualifying purchases. This supports keeping the website ad-free.

Posted on

Meal Prep: Juicy Chicken Breast

Friends don’t let friends eat nasty chicken! This is a fast, simple method to cook juicy chicken breasts – perfect for weekend meal prep.

Chicken breasts are a staple in my diet, so I make sure they taste good. They are high in protein, lean, and relatively flavor neutral so can be spiced up in almost any combination imaginable.

They are one of those foods that are super delicious when prepared well, but can also be a rubbery or dried out nightmare if not done right. I don’t like eating things that taste like tires, so I went on a mission to identify a fast, failsafe way to cook chicken tenderloins and breasts.

This chicken comes out MOIST, every time. The best part is that you don’t need to turn on the oven or stove…. it’s all about the George Foreman tabletop grill! Using a batch style process, you can cook 1-2 lbs of chicken breasts in less than 30 minutes. I like to use breast tenderloins as it saves me the step of butterflying whole breasts.

In this example, I use just salt and pepper for seasoning however you could use just about anything. I keep a supply of this chicken in the fridge and eat it throughout the week. I usually throw it on lettuce, toss on cooked vegetables, or put in soup. It also makes great chicken salad.

You Will Need:

1-2 lbs of chicken breast tenderloins, or butterflied chicken breasts, fridge temperature

Cutting board

1 extra large bowl

1 piece of aluminum foil

Tabletop grill, such as the George Foreman grill

Canola spray oil

Cracked black pepper and sea salt

Instructions

Before starting, ensure your chicken is not frozen. It should be cold, at refrigerator temperature. If you are using full size chicken breasts, butterfly them first.

Step 1: Plug in your tabletop grill and allow it to heat up. Do not spray any oil on the grill just yet.

Step 2: Take your chicken out of the fridge and lay out the pieces on a cutting board.

Step 3: Add salt and pepper on the top face of the chicken, amount to your liking.

Step 4: When your grill reaches temperature, lightly spray the top and bottom grill surface with oil.

Step 5: Place your chicken tenderloins, (salt and pepper side down), onto the grill. The size of my grill let’s me cook 6-7 tenderloins at a time.

Step 6: Sprinkle salt and pepper onto the top side of the chicken pieces, amount to your liking.

Step 7: Close the grill, cook for 4 minutes

Step 8: THIS IS THE MOST IMPORTANT STEP: Remove your chicken pieces from the grill and place them into the large bowl. Immediately cover the bowl with the aluminum foil.

Step 9: Set the bowl aside, and repeat the entire process again for your remaining chicken, making sure to transfer each batch to the bowl and re-covering with the foil immediately after.

NOTE: allow the entire covered bowl of chicken to come to room temperature on the countertop before transferring to a storage container and putting in the fridge. This resting time ensures the chicken stays juicy. Note that the bowl will contain some extra juices, which you can also dump into the storage container and use when you eat.

Enjoy and let me know if you tried out this method!

If you need additional support on meal prep strategies, feel free to reach out. Click the button below if you want to get started with nutrition coaching.

Posted on

Raw vs. Cooked Food Measurement

Weighing and tracking food can seem a bit overwhelming at first. It takes some time to build the habit of weighing and entering items. It additionally requires diligence to ensure that the food is indeed the correct nutritional representation of both amount and type within the selected tracking system. A common source of error is the weight difference between raw and cooked food. Raw vs. cooked food measurement error can lead to under-reporting or over-reporting energy intake versus actual intake. The impact can be significant – several hundred calories per day or more – if the same incorrect entry is repeated in frequently.

Raw vs. cooked food measurement – which is better?

Measurement of uncooked food is more precise and eliminates the risk of variance related to cooking procedures. That said, sometimes it’s more practical to weigh cooked. Here are a few practical rules of thumb to convert between them.

Meats, poultry, seafood, and potato LOSE ~ 25% water weight when cooked.

Uncooked cooked meat

Whether broiled, baked, or sautéed, animal meat loses approximately 25% of its mass when cooked. As meat cooks, water is driven off (same applies for baked potato!). Only water is lost; the caloric and macronutrient values do not change despite the change in scale weight. Therefore 113 g/4 oz. raw meat is NOT equal to 113 g/4 oz. cooked from a calorie or macronutrient perspective because water has been eliminate in cooking.

This conversion table (shown in both ounces and grams) provides the estimated raw weight of meats based on the cooked weight. Knowing the cooked weight, it’s possible to back-calculate the raw weight equivalent by dividing the cooked weight by 0.75. This accounts for 25% water loss. It also works in the reverse. If you have the raw weight, multiply by 0.75 to get the cooked weight.

This is handy as an estimation for dining out. Say for example the entrée had a piece of grilled chicken breast and you want to estimate calories and macros in your tracker. If you received ~ 4 oz. of cooked chicken (using the palm of your hand as an estimate), you’d then find a validated entry for raw chicken breast and input the portion as 5.3 oz.

  • 4 oz. raw chicken = 168 kcal, 21.7 g Protein, 6.3 g Fat, and 0 g carbs – incorrect entry for 4oz. cooked coked chicken
  • 5.3 oz. raw chicken = 223 kcal, 32.5 g Protein, 9.4 g Fat, 0 g carbs – correct entry for 4oz. cooked chicken.

Rice, oats, pasta, and beans gain weight when cooked.

Cooking time and volume of water vary between these foods, but the following multipliers are a reasonable estimate to account for water gain. It’s the exact opposite circumstance as meat, the scale weight increases for the same calories and macros due to water weight.

Food weight tracking errors can add up over time if you frequently eat the same foods. I hope that this quick guide was helpful! Contact me if you need some assistance.

Follow me on Instagram and Facebook.